
Maplex—Automatic
Cartographic Name Placement Software
An ESRI White
Paper • August 1998
Maplex—Automatic
Cartographic Name Placement Software
An ESRI White
Paper • August 1998
Copyright © 1998 Environmental Systems
Research Institute, Inc.
All rights reserved.
Printed in the United States of America.
The information contained in this document
is the exclusive property of Environmental Systems Research Institute, Inc.
This work is protected under United States copyright law and other
international copyright treaties and conventions. No part of this work may be
reproduced or transmitted in any form or by any means, electronic or
mechanical, including photocopying and recording, or by any information storage
or retrieval system, except as expressly permitted in writing by Environmental
Systems Research Institute, Inc. All requests
should be sent to Attention: Contracts
Manager, Environmental Systems Research Institute, Inc., 380 New York Street,
Redlands, CA 92373-8100 USA.
The information contained in this document
is subject to change without notice.
U.S. Government Restricted/Limited Rights
Any software, documentation, and/or data
delivered hereunder is subject to the terms of the License Agreement. In no event shall the Government acquire
greater than RESTRICTED/LIMITED RIGHTS.
At a minimum, use, duplication, or disclosure by the Government is
subject to restrictions as set forth in FAR §52.227-14 Alternates I, II, and
III (JUN 1987); FAR §52.227-19 (JUN 1987) and/or FAR §12.211/12.212 (Commercial
Technical Data/Computer Software); and DFARS §252.227-7015 (NOV 1995) (Technical
Data) and/or DFARS §227.7202 (Computer Software), as applicable. Contractor/Manufacturer is Environmental
Systems Research Institute, Inc., 380 New York Street, Redlands, CA 92373-8100
USA.
In the United States and in some countries,
ARC/INFO, ArcCAD, ArcView, ESRI, and PC ARC/INFO are registered
trademarks; 3D Analyst, ADF, AML, ARC COGO, ARC GRID, ARC NETWORK, ARC News, ARC TIN, ARC/INFO, ARC/INFO
LIBRARIAN, ARC/INFO—Professional GIS, ARC/INFO—The World's GIS, ArcAtlas,
ArcBrowser, ArcCAD, ArcCensus, ArcCity, ArcDoc, ARCEDIT, ArcExplorer,
ArcExpress, ARCPLOT, ArcPress, ArcScan, ArcScene, ArcSchool, ArcSdl, ARCSHELL,
ArcStorm, ArcTools, ArcUSA, ArcUser,
ArcView, ArcWorld, Atlas GIS, AtlasWare, Avenue, BusinessMAP, DAK, DATABASE INTEGRATOR, DBI Kit, ESRI, ESRI—Team
GIS, ESRI—The GIS People, FormEdit, Geographic Design System, GIS by ESRI, GIS
for Everyone, GISData Server, IMAGE INTEGRATOR, InsiteMAP, MapCafé, MapObjects, NetEngine, PC ARC/INFO,
PC ARCEDIT, PC ARCPLOT, PC ARCSHELL, PC DATA CONVERSION,
PC NETWORK, PC OVERLAY, PC STARTER KIT, PC TABLES, SDE, SML,
Spatial Database Engine, StreetMap, TABLES, the ARC COGO logo, the ARC GRID
logo, the ARC NETWORK logo, the ARC TIN logo, the ARC/INFO logo, the
ArcCAD logo, the ArcCAD WorkBench logo, the ArcData emblem, the ArcData logo,
the ArcData Online logo, the ARCEDIT logo, the ArcExplorer logo, the ArcExpress
logo, the ARCPLOT logo, the ArcPress logo, the ArcPress for ArcView logo, the
ArcScan logo, the ArcStorm logo, the ArcTools logo, the ArcView 3D Analyst
logo, the ArcView Data Publisher logo, the ArcView GIS logo, the ArcView
Internet Map Server logo, the ArcView Network Analyst logo, the ArcView Spatial
Analyst logo, the ArcView StreetMap logo, the Atlas GIS logo, the Avenue logo,
the BusinessMAP logo, the BusinessMAP PRO logo, the Common Design
Mark, the DAK logo, the ESRI corporate logo, the ESRI globe logo, the MapCafé
logo, the MapObjects logo, the MapObjects Internet Map Server logo, the
NetEngine logo, the PC ARC/INFO logo, the SDE logo, the SDE CAD Client
logo, The World's Leading Desktop GIS, ViewMaker, Water Writes, and Your Personal Geographic Information System are
trademarks; Maplex is a service mark registered in the United States and a
trademark registered in the United Kingdom owned by ESRI (UK) Limited; and
ArcData, ARCMAIL, ArcOpen, ArcQuest, ArcWatch,
ArcWeb, Rent-a-Tech, www.esri.com, and @esri.com are service marks of
Environmental Systems Research Institute, Inc.
The names of other companies and products
herein are trademarks or registered trademarks of their respective trademark
owners.
Maplex—Automatic Cartographic Name Placement Software
An ESRI White Paper
Contents Page
Label Placement Aims 1
Maplex Basics 1
Rulebase and Parameters 2
Other Parameters 2
Special Features 2
ARC/INFO Annotation Export and Label Box Export 2
U.S. Route Number Shields and User-Defined Label Boxes 2
Maplex File Manager 2
Imperial Units Support 2
Support for Donut Polygons (i.e., polygons with holes) 3
Street Mapping¾European Style 3
Street Mapping¾American Style 3
Requirements 3
User Interface 3
The Main Menu Bar 3
The Toolbar 3
The Plot Window 4
The Status Bar 4
Example Maps 4
Using Maplex 4
Basic Procedure for Using Maplex 4
Contents Page
Projects 4
The Elements of a Project 5
Creating a New Project 5
The Automatic Rulebase Generator 5
Output Files 6
Basic Data Loading 6
Data File Prerequisites 6
Data Format Screen 7
Data File Format 7
Data File Units 7
Map Units 7
Decimal Degrees 7
Topological Structuring 7
Connect Line Segments 7
Connect Line Segments with Different Symbology 8
Identify Street Junction Nodes Not Located at Line
Segment End 8
Extract Area Features 8
Ignore Duplicate Features 8
Maplex File Manager 8
Data Sets 8
Shapefiles 8
Specifying DBF Field Names 8
Concatenating DBF Field Names and Text 9
Feature Identifiers and Symbol Rotation 10
Feature Classification 10
Feature Class Table 10
Feature Class Parameters 10
Feature Class Types 10
Aliases 11
The Rulebase Editor 11
Entering the Feature Classification 12
Rulebase Units 12
Popup Dialogs 12
Map Symbolization 12
Symbolizing Features 13
Symbol Colors 13
Angled Point Symbols 13
Contents Page
Symbolizing Labels 13
Screen Fonts 13
Label Boxes 14
Symbol Plotting Order 14
Land and Sea 14
Plot Menu 14
Plot Options 14
View Commands 14
Label Transformation 15
Label Translations 15
Label Case Conversion and Alphabetic/Numeric Filtering 15
Multilabels 15
Multilabel Extraction 15
Multilabel Positioning 16
Selecting a Label from a Comma-Delimited Input Label 16
Fonts 17
PostScript Fonts 17
Specifying a Custom List of Fonts 17
ISO Encoding 17
Show Minus Signs as Hyphens 17
Character Sets with More than 256 Characters 17
Specifying Character Values Greater than 255 in Labels 17
Cap Heights Versus Font Heights 18
Label Placement 18
Label Style 18
Label Alignment for Point Features 18
Preferred Label Zones 18
Label Stacking 18
Stacking Strategy 19
Justification of Stacked Labels 19
Label Offsets and Buffers 19
Feature Weights 19
Label Weights 19
Deletion Priorities 19
Labeling Networks of Line Features 20
Connecting Line Features 20
Graphical Connection 20
Logical Connection 20
Contents Page
Stretching Line Labels to Fit the Line 20
Streets 20
Creating Street Feature Classes 20
Labeling Segmented Streets 20
Conflict Resolution with Nonstreet Labels 20
Input Data Requirements 20
Rulebase Parameters 20
Abbreviating Street Names 21
Stacking 21
Overrun 21
Font Width Compression 21
Font Height Reduction 21
End of Street Clearance 21
Word Spacing 21
Labeling Area Features 21
Preset Labels 21
Using Preset Labels in the Map 22
Fixing Labels 22
Saving Deleted Labels 22
Maplex File Output 22
Saving Features and Unplaced Labels 22
Saving Placed Labels 22
Maplex Format 22
ARC/INFO Annotation and Label Box Output 22
ARC/INFO Annotation Export 23
ARC/INFO Label Box Export 23
Label Levels and Unplaced Labels 23
Saving Placed Labels and Symbolized Features 23
Settings for PostScript, Illustrator, and FreeHand Formats 23
Batch Mode 24
Operating Maplex in Batch Mode 24
The Batch Setup Screen 24
Graticule Alignment and Projection 25
Feature Projection 25
Maplex Parameters for Graticule Alignment 25
User-Defined Symbols 25
Illustrator Symbols in Maplex 25
Contents Page
Colors 26
The Color Table Editor 26
Changing the Colors 26
Rulebase Parameters 26
Feature Class Parameters 26
Loading Parameters 26
Symbology Parameters 27
Font Parameters 29
Box Parameters 30
Placement Parameters 31
Stacking Parameters 35
Multilabel Parameters 36
Street Labeling Parameters 37
Deletion Parameters 37
Export Parameters 37
Maplex—Automatic Cartographic Name Placement Software
Maplex takes digital cartographic data, symbolizes them according to user specifications, and places labels clearly and unambiguously. In addition to producing files of positioned labels, Maplex also helps to produce symbolized maps in Encapsulated PostScript, Illustrator, and FreeHand formats.
|
Maplex works to place map labels in such a way that the following goals are met: |
![]() No ambiguity in regard to which label
refers to which feature
No ambiguity in regard to which label
refers to which feature
![]() Minimization of overlap between labels
Minimization of overlap between labels
![]() Minimization of overlap between labels and
features
Minimization of overlap between labels and
features
![]() Aesthetically pleasing overall placement
Aesthetically pleasing overall placement
|
Maplex reads vector map data and topologically structures those data. This structuring involves connecting the separate line segments that usually occur in the data into a linear network or into polygonal areas. |
The structured vector data are converted into a map according to user-specified symbolization. This map forms the background of features onto which the labels are placed. The features are allocated weights to indicate their relative importance on the map.
In most cases, the features will have
labels associated with them. The labels
themselves generally do not have a specific position—they are positioned
relative to their features. A single
feature may have many labels associated with it: these are called multilabels.
Maplex can take a relatively complex input label from the data files and manipulate it in a variety of ways. For example, Maplex can
![]() Split an input label at any of a number of
specified characters to form a stacked label of up to fifty lines.
Split an input label at any of a number of
specified characters to form a stacked label of up to fifty lines.
![]() Change an input label to uppercase or title
case.
Change an input label to uppercase or title
case.
![]() Take an input label and substitute a
translation or an abbreviation.
Take an input label and substitute a
translation or an abbreviation.
![]() Filter out digits or alphabetical
characters.
Filter out digits or alphabetical
characters.
![]() Select any one of eight label components
from an input label that is in the form of a comma-delimited list.
Select any one of eight label components
from an input label that is in the form of a comma-delimited list.
![]() Extract up to four
parts (multilabels) from an input label and place them in a stack or
independently (assigning to them individual placement rules, fonts, font sizes,
colors, etc.).
Extract up to four
parts (multilabels) from an input label and place them in a stack or
independently (assigning to them individual placement rules, fonts, font sizes,
colors, etc.).
Label placement rules must be entered into the Maplex Rulebase. The user can specify conventions for positioning labels and adjust many parameters to control placement details such as how far a label should be from its feature and how far it should be from other labels.
Maplex places the labels on the map taking into account the weights (priorities) that have been allocated to particular features. Features given high weights are less likely to be obscured than are features with low weights. Maplex generates a large number of trial positions for each label and then evaluates them according to the goals of label placement until the best position is determined for each label.
|
Maplex stores all symbolization and label placement parameters in a Rulebase. Parameters are applicable to each feature class (identified by a unique feature code) in the data. Therefore, if there are 100 feature classes in the Rulebase, there will need to be, for |
example, 100 symbol fill color parameters, one for each feature class. There are approximately 125 feature class-based rules.
|
Other Parameters |
Other aspects of Maplex software's functionality are controlled by different parameters. For example, parameters exist for controlling PostScript output in the Export Map dialog box, while projection settings for graticule alignment are set up in a Projections dialog box. |
|
Most recently added special features of Maplex include |
|
ARC/INFO Annotation Export and Label Box Export |
Maplex writes placed labels as an ARC/INFO® annotation layer. Label boxes are also output as an arc coverage. These can be built into regions so they can be filled. Symbology files (textset, lineset, and shadeset) are created so that the map can be drawn in ARCPLOT™ software as it appears in Maplex. Unplaced labels are also output and you have control over the inclusion or display of these elements. |
|
U.S. Route Number Shields and User-Defined Label Boxes |
Maplex supports five styles of label box corresponding to the most popular kinds of U.S. route number marker symbols: interstate (red/blue), interstate (solid top), interstate (open), federal highway, and rounded rectangle. In addition, label boxes in Adobe Illustrator can be created and imported into Maplex. |
|
Maplex File Manager |
The Maplex File Manager provides a simplified interface for loading data files into Maplex. It is a generic screen for loading data files in any supported format. |
|
Imperial Units Support |
Maplex supports imperial units such as feet or yards. The data units field on the data format screen includes a large range of units. You can enter your own conversion factor to convert data in custom units into meters. |
|
Support for Donut Polygons (i.e., polygons with holes) |
Maplex draws polygons with holes in them. This is currently available only to users of shapefiles. |
|
Street Mapping—European Style |
Maplex provides high-quality curvature of labels inside street casing, the most common method of labeling European streets. Parameters that control text placement provide excellent results through facilities including |
![]() Overrun—Text is
allowed to overrun the ends of the street into areas of free space or into
street junctions.
Overrun—Text is
allowed to overrun the ends of the street into areas of free space or into
street junctions.
![]() Truncation—Street
names can be truncated by automatically removing characters from the end of the
street name (e.g., Radnor Rd could be truncated to Radn. Rd).
Truncation—Street
names can be truncated by automatically removing characters from the end of the
street name (e.g., Radnor Rd could be truncated to Radn. Rd).
![]() Stacking—Where
appropriate, labels may be treble-stacked.
Stacking—Where
appropriate, labels may be treble-stacked.
|
Street Mapping—American Style |
Most of the placement techniques used in the European style of street mapping apply to the American style. |
The American style differs from the European style in that solid lines represent the streets and the text is placed offset from the street. Maplex works to place the text above streets that are horizontal and to the left of streets that are vertical. Streets are usually labeled once with the words being well spaced out.
|
Requirements |
Maplex requires an IBM-compatible PC with the following minimum specification: |
![]() Pentium processor
Pentium processor
![]() Windows NT Version
4.0
Windows NT Version
4.0
![]() 32 MB of RAM (64 MB
recommended)
32 MB of RAM (64 MB
recommended)
![]() SVGA graphics card
SVGA graphics card
|
|
|
The
main menu options are |
![]() File—Open,
close, save, and export data and graphics files.
File—Open,
close, save, and export data and graphics files.
![]() Project—Open, create, and
save projects.
Project—Open, create, and
save projects.
![]() Map—Edit
map-related parameters.
Map—Edit
map-related parameters.
![]() Placement—Label
placement options.
Placement—Label
placement options.
![]() Plot—Control
the plotting of map objects and view unplaced labels.
Plot—Control
the plotting of map objects and view unplaced labels.
![]() View— Graphics operations such as panning/zooming.
View— Graphics operations such as panning/zooming.
![]() Tools— Access to tools such as an on-screen ruler.
Tools— Access to tools such as an on-screen ruler.
![]() Help—Online
help, the user manual, and tutorial.
Help—Online
help, the user manual, and tutorial.
|
The toolbar contains buttons that provide quick access to menu items. Moving the mouse pointer across the toolbar items will bring down "tool tips" naming each button, and a short description of the item will be given in the status bar at the bottom of the Maplex window. |
|
|
The graphics operations that can be performed on the map are as follows: |
![]() Zoom in—Click and drag the
mouse to create a zoom rectangle. The
zoom in function is always enabled (unless the ruler tool is being used). There
is also a "positive" magnifying glass icon that zooms in (2x) on the center of the current map view.
Zoom in—Click and drag the
mouse to create a zoom rectangle. The
zoom in function is always enabled (unless the ruler tool is being used). There
is also a "positive" magnifying glass icon that zooms in (2x) on the center of the current map view.
![]() Zoom out—Use
negative magnifying glass icon.
Zoom out—Use
negative magnifying glass icon.
![]() No zoom—Use crossed
magnifying glass.
No zoom—Use crossed
magnifying glass.
![]() Zoom to scale— Use the 1:M magnifying glass.
Zoom to scale— Use the 1:M magnifying glass.
![]() Panning— Use arrow icons or cursor keys—the user can
only pan if zoomed in.
Panning— Use arrow icons or cursor keys—the user can
only pan if zoomed in.
![]() Querying— Click on a feature and view its feature class
code, description, and label in the status bar.
Querying— Click on a feature and view its feature class
code, description, and label in the status bar.
![]() Edit Parameters—Double clicking on a map feature pops up the Rulebase Editor.
Edit Parameters—Double clicking on a map feature pops up the Rulebase Editor.
![]() Ruler— Used
for measuring straight-line distances on the map.
Ruler— Used
for measuring straight-line distances on the map.
|
The status bar is located at the bottom of the screen. It displays help on selected toolbar items and menu items. It also displays the current project folder. If the cursor is |
clicked in the plot window then the map coordinates of the selected location are displayed. Click on a feature, and it also displays the feature's class code and class description.
|
Maplex comes with example maps that illustrate different label placement styles. These examples provide a useful reference for typical parameter settings. |
The ReadMe file supplied with Maplex describes the example projects and data bundled with Maplex.
|
There is a logical order to the operation of Maplex as one task is usually dependent on the completion of another. |
|
Basic Procedure for Using Maplex |
1. Create a project for the map. 2. Enter (or generate) a feature classification. 3. Symbolize the map. 4. Specify label placement rules. 5. Run label placement and refine label placement rules. 6. Export placed names or map graphics. |
|
The specifications and any other information needed to process the data are held in a project. There will typically be many projects that correspond to different types of maps. |
The specifications held in a project will usually be applicable to any mapping task that has the same feature classification and the same requirements for feature symbolization and label placement.
|
A project contains the specification files required to process the map. In the Windows NT file system, each project has its own folder that contains the project files. In Maplex, the active project is selected by selecting a project folder. |
A project contains the following kinds of information:
![]() Feature classification
Feature classification
![]() Rulebase specification
Rulebase specification
![]() Program settings
Program settings
![]() Font metrics
Font metrics
![]() Color definitions
Color definitions
![]() Projection settings
Projection settings
![]() User-defined symbols
User-defined symbols
|
When creating a new project, a dialog will prompt you for two pieces of information: |
1. The location of the project—Since a project corresponds to a folder in the file system (i.e., directory path) a folder must be selected for the new project. Maplex will create the folder if it does not exist.
2. The method used to create the project—The options are as follows:
· Create an empty project. Maplex creates the folder if it does not exist and a few fundamental project files are copied into the project folder. All the parameters such as the feature classification and Rulebase parameters must be entered.
· Create a project based on the current project. Same as above except Maplex copies the current project into the new project (just like a SaveAs operation), so all the parameters set up in the previous project are already set.
· Create project and generate Rulebase. Maplex creates a starter project based on the map data. This is the quick start option.
|
The Rulebase Generator analyzes data and identifies the unique feature class codes. This allows it to build a feature classification table. By analyzing the geometry of each feature Maplex can determine whether the feature class is a point, line, or area type. This enables sensible default values to be allocated to each feature class in the Rulebase. |
The following sequence of events will occur:
![]() The data format screen will appear. Select the data file format and units. If the data are in decimal degrees a
projection must be set. There are also
default values for the topological structuring options.
The data format screen will appear. Select the data file format and units. If the data are in decimal degrees a
projection must be set. There are also
default values for the topological structuring options.
![]() Enter the map scale.
Enter the map scale.
![]() Define a data set using the Maplex File
Manager. The feature classification
will be generated from the files specified at this stage.
Define a data set using the Maplex File
Manager. The feature classification
will be generated from the files specified at this stage.
![]() Check the Rulebase. When the automatic Rulebase Generator has
finished, the user will be prompted to check the default values.
Check the Rulebase. When the automatic Rulebase Generator has
finished, the user will be prompted to check the default values.
![]() Load data and display. The data must be reloaded (the first time
they were loaded was for generating the Rulebase).
Load data and display. The data must be reloaded (the first time
they were loaded was for generating the Rulebase).
After completing this sequence of events a crude version of the map is displayed. At this point, the user can interactively query the map to identify the features and proceed to customize the default values.
|
There are five kinds of output files: |
![]() Label files (conventional extensions .mpl or .txt)—Label files can be used as input to other cartographic software such as
ARC/INFO or fed back into Maplex as a preset
label file (.mpl files only).
Label files (conventional extensions .mpl or .txt)—Label files can be used as input to other cartographic software such as
ARC/INFO or fed back into Maplex as a preset
label file (.mpl files only).
![]() Feature files (conventional extensions .map or .txt)—Maplex can be used as a map
data processor. For example, a region
can be clipped and then the clipped data can be saved in an output file that
can then be used for other processing.
Maplex
software's feature inclusion parameters can also be used to filter map data and
produce smaller files.
Feature files (conventional extensions .map or .txt)—Maplex can be used as a map
data processor. For example, a region
can be clipped and then the clipped data can be saved in an output file that
can then be used for other processing.
Maplex
software's feature inclusion parameters can also be used to filter map data and
produce smaller files.
![]() PostScript files (conventional extension .ps)—These are Encapsulated PostScript and are used for sending to a PostScript printer or for use within documents.
PostScript files (conventional extension .ps)—These are Encapsulated PostScript and are used for sending to a PostScript printer or for use within documents.
![]() FreeHand files (conventional extension .ps)—These can be manipulated using the
MacroMedia FreeHand graphics package. Formats
for versions 3 and 5 are supported.
FreeHand files (conventional extension .ps)—These can be manipulated using the
MacroMedia FreeHand graphics package. Formats
for versions 3 and 5 are supported.
![]() Illustrator files (conventional extension .ai)—These can be manipulated using the
Adobe Illustrator graphics package.
Illustrator files (conventional extension .ai)—These can be manipulated using the
Adobe Illustrator graphics package.
|
|
|
Maplex requires vector data that consist of a series of records where each record contains the following information: |
![]() Spatial position of feature
Spatial position of feature
![]() Associated label (optional)
Associated label (optional)
![]() A code that specifies the characteristics
of the feature and label
A code that specifies the characteristics
of the feature and label
For example:
![]() 12323,23434 Map coordinates for town symbol
12323,23434 Map coordinates for town symbol
![]() Cardiff Label
(without a position)
Cardiff Label
(without a position)
![]() FC12 Feature
class code
FC12 Feature
class code
The label does not have a fixed position. The feature has a position, and the label is associated with the feature. Maplex determines the position of the label relative to the feature, taking into account other features and labels in the neighborhood, and outputs the result.
The feature class code references a specification (i.e., a set of parameters stored in the Rulebase) that determines the characteristics of that feature and label. It is used to specify the feature's symbol, the label's font, positioning rules, and so forth.
|
The first step to getting data into Maplex is to specify the data format and its associated parameters. It is important to specify the data format first because other screens in Maplex (such as the Maplex File Manager) change their appearance depending on the data format. The parameters on the data format screen are as follows. |
|
Data File Format |
Input Format Extension/Alias ESRI Shapefile Format SHP LaserScan Internal Feature Format TXT/IFF MAPDATA Format MAP
|
|
Data File Units |
|
|
Map Units |
This option is used if the data have been projected. The user can select the file units from the options list (e.g., meters, kilometers, feet, yards). If the required unit does not appear on the options list then the user-defined conversion factor can be set. |
|
Decimal Degrees |
This option is used if the data have not been projected and are stored in decimal degrees. A projection must be entered if this option is selected. Maplex will load the data and project the coordinates of the features into meters, after which the work will be shown in meters in the user interface. |
|
Topological Structuring |
The raw data must
be converted into a structured form to allow text placement to be
performed. The structuring process is
performed dynamically as the data are loaded into Maplex. The structured data exist in memory in the
Maplex application and are not saved to disk. The options to control the topological structuring are as
follows: |
|
Connect Line Segments |
This causes Maplex to connect individual line segments into linear features. This is usually essential because linear features, such as roads and rivers, are digitized as many small segments that must be connected together to create the original feature. |
The line segments are connected together using the following rule: segments that have the same feature symbology and label text are connected together. Note that they do not require the same feature class code.
|
Connect Line Segments with Different Symbology |
This option forces Maplex to treat line features that change symbology along their length as a single composite feature for name placement purposes. The connection only affects label placement—the symbolization remains unaffected. |
|
Identify Street Junction Nodes Not Located at Line Segment End |
Some linear data are digitized so that a single segment spans a junction and the junction occurs at a point within the segment. This option is used to split the segment into two segments, one on either side of the junction, allowing the street to be correctly labeled. |
|
Extract Area Features |
Area feature extraction refers to the task of creating area features from line features and seeds. The line features are connected together to form the boundary of the area feature, and the seed points are used to identify the interior of the area. A specially coded seed point is usually supplied with this kind of data. |
|
Ignore Duplicate Features |
Some data sets contain duplicate features (i.e., features that have exactly the same spatial position and attributes). Enabling this option will allow Maplex to remove the duplicates as the data are loaded. A feature is considered to be a duplicate if it has the same feature class code, label text, and position. |
|
The Maplex File Manager manages the list of data files that are sets of data that may cover different regions and/or contain different types of features the user is employing. The Maplex File Manager provides a way to list all of the data files the user wants to load into Maplex and provides a means to give Maplex more information about certain types of files. |
|
Data Sets |
The Maplex File Manager operates on files called data sets. A data set lists the data files to be loaded into Maplex. When a data set is opened, each file in the list that has the loading switch set is opened and loaded into Maplex. |
The data files can reside anywhere on the file system. The path to each data file must be specified; this can be the full path or a path relative to the Maplex root installation directory.
The Maplex File Manager allows the user to create more than one data set. The data set is stored under a user-defined name with a .ds extension. The file browser is of the multiselect type so the user can select many files in one operation using the control and/or shift keys.
|
Maplex needs to read the feature class code and the label text from the DBF file, but because the attributes are user-definable Maplex does not know where to find them, so the user needs to give Maplex this information. Thus, the field name in each DBF file must be specified for the feature class code and label text. |
|
Specifying DBF Field Names |
The Maplex File Manager supports the processes of specifying the DBF field names. When the data format is set to shapefile additional columns appear in the file list. These columns, referred to as the shapefile properties, allow easy specification of the DBF field names. |
|
Concatenating DBF Field Names and Text |
In the majority of cases simply specifying one field name will suffice, but sometimes a more complex expression needs to be entered. |
![]() If the label text is not stored in one
field in the DBF file, it is held across several different fields in the DBF
file that must be combined.
If the label text is not stored in one
field in the DBF file, it is held across several different fields in the DBF
file that must be combined.
· For example, a street name may be stored in three fields: one for the prefix, one for the primary name, and one for the suffix.
If these fields were called PREFIX, PRIMARY, and SUFFIX in the DBF file, the user can enter the expression:
"PREFIX" "PRIMARY" "SUFFIX"
in the label field name, and Maplex would concatenate the field names together, separated by spaces, to build up the full label name.
![]() Every feature in a shapefile needs to be
treated as one feature class code and the user doesn't want to specify a field
name. A single code, such as RIVER, would
suffice for the entire file.
Every feature in a shapefile needs to be
treated as one feature class code and the user doesn't want to specify a field
name. A single code, such as RIVER, would
suffice for the entire file.
![]() No one field in the file can be used as a
unique feature class code, but several fields could be combined to make a
unique feature class code.
No one field in the file can be used as a
unique feature class code, but several fields could be combined to make a
unique feature class code.
Suppose a ROADS data set has the following fields:
Code Type Number Name Length
ROAD A 34 WESTWAY 23.2
ROAD B 553 HOLBURN ROAD 4.3
ROAD A 237 GIGGLESWORTH ST 3.3
The user could enter the expression:
"TYPE"_"CODE"
This would generate feature class codes called A_ROAD and B_ROAD. Note that there is no space between the field names, but an underscore "_" is, and A_ROAD and B_ROAD would be entered in the Rulebase as feature class codes.
![]() There's a field in the DBF file, such as a
feature type, that is a unique code within the file but it is not unique across
all of the data files.
There's a field in the DBF file, such as a
feature type, that is a unique code within the file but it is not unique across
all of the data files.
For example, suppose the DBF field "TYPE" contains a value 1 that is a small town in a towns file, but a value 1 is also used in the roads file to represent a motorway. Some text can be added to the field name to make it unique within Maplex. The file list could read:
Shapefile
Name Loading Switch Feature Class Field Name Label Field Name
C:\data\town.shp Yes T"TYPE" "NAME"
C:\data\roads.shp Yes R"TYPE" "NAME"
This would produce feature class codes T1 and R1. Feature class codes T1 and R1 would be entered in the Rulebase.
|
Feature Identifiers and Symbol Rotation |
There are two optional DBF fields that Maplex can support. |
![]() Feature
ID field name—If the features are tagged with identifiers, then these can
be passed through Maplex and the exported text (and features) will be tagged
with the identifier. This is commonly
used when exporting to annotation.
Feature
ID field name—If the features are tagged with identifiers, then these can
be passed through Maplex and the exported text (and features) will be tagged
with the identifier. This is commonly
used when exporting to annotation.
![]() Angle
field name—Maplex can rotate point symbols, such as direction markers, on
the map. The angle must be stored as an
attribute in the DBF file.
Angle
field name—Maplex can rotate point symbols, such as direction markers, on
the map. The angle must be stored as an
attribute in the DBF file.
|
All of the features on a map must be classified in terms of their basic properties. In Maplex these classifications are called feature classes. Examples of feature classes are towns, roads, rivers, and railways. |
Every feature class is uniquely identified by a code, the feature class code. When Maplex loads a feature it uses this code to identify the feature class to which the feature belongs. Information based on the feature class controls how Maplex loads, symbolizes, processes, and displays that feature.
|
A fundamental step in the operation of Maplex is to compile a list of the feature classes required and enter them into Maplex. This is performed in the codes tab in the Rulebase. |
|
Any value can be entered for the feature class code, providing it uniquely identifies the feature class. The feature class code is the key field in the table, so duplicate values are not permitted. |
![]() Feature
class code—Uniquely identifies each feature
class.
Feature
class code—Uniquely identifies each feature
class.
![]() Feature
class description— Holds a short description of
the feature class code. It is for
reference only and is not used for processing.
Feature
class description— Holds a short description of
the feature class code. It is for
reference only and is not used for processing.
![]() Feature
class type— Specifies a basic
classification of feature classes in terms of their elementary geometry. The classes are point feature, line feature,
area feature, area-point feature, street feature, extracted area feature, and
extracted area-point feature.
Feature
class type— Specifies a basic
classification of feature classes in terms of their elementary geometry. The classes are point feature, line feature,
area feature, area-point feature, street feature, extracted area feature, and
extracted area-point feature.
|
Feature Class Types |
|
![]() Line features
have two or more coordinates. Maplex
joins the coordinates with straight-line segments. It can place curved or straight labels along the line. Line features that form networks or connect
to other features should connect at nodes (i.e., a single point present in each
feature).
Line features
have two or more coordinates. Maplex
joins the coordinates with straight-line segments. It can place curved or straight labels along the line. Line features that form networks or connect
to other features should connect at nodes (i.e., a single point present in each
feature).
![]() Area features
have three or more coordinates (Maplex closes the area if the start and end
coordinates are different) representing a simple filled polygon with no holes or
crossovers. The label can be inside or
outside the area, horizontal, or curved to follow its natural shape.
Area features
have three or more coordinates (Maplex closes the area if the start and end
coordinates are different) representing a simple filled polygon with no holes or
crossovers. The label can be inside or
outside the area, horizontal, or curved to follow its natural shape.
![]() Area-point
features are specified in the data file exactly as normal area features. They differ in that they are considered too
small to attempt to place the label in their interior.
Area-point
features are specified in the data file exactly as normal area features. They differ in that they are considered too
small to attempt to place the label in their interior.
![]() Street features
are geometrically specified exactly as normal line features, but a different
strategy is used when positioning the labels for these features.
Street features
are geometrically specified exactly as normal line features, but a different
strategy is used when positioning the labels for these features.
![]() Extracted area
features are area features but are constructed from boundary line features by
Maplex rather than being specified explicitly as areas.
Extracted area
features are area features but are constructed from boundary line features by
Maplex rather than being specified explicitly as areas.
![]() Extracted
area-point features are area-point features but are constructed from boundary
line segments and a seed point by Maplex rather than being stored explicitly as
an area.
Extracted
area-point features are area-point features but are constructed from boundary
line segments and a seed point by Maplex rather than being stored explicitly as
an area.
|
The aliasing facility can be used to combine several feature classes in the data into one feature class that is entered in the Rulebase. |
|
The Rulebase holds the feature classification and it allows the user to specify the characteristics of each feature class. Most parameters in Maplex are specified on a per feature class basis, so most of the work is performed in the Rulebase. The Rulebase is created and maintained using the Rulebase Editor. The Rulebase is viewed as a large table that has a row for each feature class and a column for each parameter. The table is divided into folders, or tabs, that contain a group of related parameters. There is an index to quickly locate a parameter and search facilities to view a subset of the feature classes. |
 The full Rulebase has over 100 parameters and
may contain up to 4,000 feature classifications.
The full Rulebase has over 100 parameters and
may contain up to 4,000 feature classifications.
|
The Rulebase parameters are categorized into groups, each of which appear in their own tab. The important point to understand about the tabs is that the codes tab is different from the other tabs. |
The codes tab is where the feature classification is created and edited. The other tabs redisplay the codes tab information, but it cannot be changed from these tabs.
|
When a parameter represents a size or distance on the map, it is
usually expressed in units of mm (millimeters), cm (centimeters), pt
(points), or in (inches). These parameters can also
be expressed in map units (i.e., the same units in which the map data are represented).
Some parameters allow the user to express a value as a percentage of
some related value. The hint field
for any given parameter will show if units or percentages are allowed. |
|
Color fields, file name fields, and label separator (or inclusion switches) fields allow the user to double click for a popup dialog. |
|
Map symbolization is the process of converting vector map data into a map that can be displayed or printed. Maplex uses the symbology specification entered in the Rulebase to symbolize the map. The symbology specification defines the appearance (shape, size, color, etc.) of map objects. |
|
|
Symbolizing features involves specifying their symbol styles, dimensions, and colors. For a line feature one of the standard styles that are built into Maplex (solid, dashed, cased, ticked, etc.) must be selected. |
For a point feature one of the standard Maplex styles (circle, rectangle, diamond, etc.) may be used or the user may design a symbol.
Area features may be cased (i.e., have an outline) or uncased. Cased areas can be filled or unfilled, and the user can specify the line style for the casing.
|
All colors in Maplex are selected from a palette of sixty-four colors. This palette is displayed as a pulldown list of color names wherever the user has to specify a color. User-defined symbols keep their own color records so the user is not limited to the colors in the Maplex color table. |
|
If the user wants to draw the symbols for a particular feature class at different angles depending on their circumstances (e.g., distance markers, gradients, level crossings) the angle must be supplied for each feature in a column in the input DBF file. This facility is |
currently only available for shapefiles.
|
For a label, two fonts need to be specified: |
![]() PostScript font—Used for the dimensions of characters
for placement and for PostScript output
PostScript font—Used for the dimensions of characters
for placement and for PostScript output
![]() Screen font—Used for display on-screen (dimensions
are still specified by the PostScript font)
Screen font—Used for display on-screen (dimensions
are still specified by the PostScript font)
The PostScript font is selected from the fonts specified in the font modifier file. This name is inserted in the PostScript output file.
In addition to specifying the font names, the font height must be specified. The font height includes all ascenders and descenders. A font aspect ratio can also be specified—if this is not 1.0 then condensed or expanded text is used.
|
The text displayed on-screen has exactly the same position and dimensions as the true text, but the typeface may be different. This is because Maplex is concerned with the placement of text, and the typeface used to display a character is not important to this process as long as Maplex knows about the size of each character (and the space between them and so on). |
The screen font is selected from a list of built-in screen fonts that correspond to several common fonts in normal, italic, and bold styles.
|
The box shape parameter allows a box to be drawn around certain labels. The default is no box. This includes rectangle, circle, diamond, oval, and some common U.S. highway shields. The thickness of the box sides is configurable, as is the distance between the text and the box sides. Alternatively, a custom box may be designed. |
|
The
symbol plotting order parameter lets the user control the order in which feature
classes are drawn. |
|
Maplex accommodates maps that have implied land and sea areas (i.e., specified by a coastline rather than explicit areas). The boundary between the land and sea can be specified and each area can be colored. This enhances the appearance of the map but does not affect label placement. |
|
The Plot menu controls which features or other graphical entities are plotted and also allows the user to set the plot quality, which controls how Maplex draws certain features. |
![]() Options— See Plot Options below.
Options— See Plot Options below.
![]() Land
and sea—Toggles plotting of the land and sea constructed areas.
Land
and sea—Toggles plotting of the land and sea constructed areas.
![]() Features —Toggles plotting of all features.
Features —Toggles plotting of all features.
![]() Labels—Toggles
plotting of the characters in a label.
Labels—Toggles
plotting of the characters in a label.
![]() Character
boxes— Toggles plotting of boxes
around the individual characters in a label.
Character
boxes— Toggles plotting of boxes
around the individual characters in a label.
![]() Unplaced
labels—Toggles plotting of unplaced labels.
Unplaced
labels—Toggles plotting of unplaced labels.
|
|
![]() Border
color—The color of the map border.
Border
color—The color of the map border.
![]() Background
color —The color of the map
background.
Background
color —The color of the map
background.
![]() Plot
rotation—Automatic, 0 degrees, 90 degrees, 180 degrees, 270 degrees.
Plot
rotation—Automatic, 0 degrees, 90 degrees, 180 degrees, 270 degrees.
Automatic rotation will maintain north to be "up"
in Illustrator and FreeHand formats.
![]() Connect
unlabeled lines —Toggles the
connection of line segments that have the same feature symbology but no text
label.
Connect
unlabeled lines —Toggles the
connection of line segments that have the same feature symbology but no text
label.
|
|
![]() Pan east— Shifts the view one screen's
width east.
Pan east— Shifts the view one screen's
width east.
![]() Pan south— Shifts the view one screen's
height south.
Pan south— Shifts the view one screen's
height south.
![]() Pan west— Shifts the view one screen's
width west.
Pan west— Shifts the view one screen's
width west.
![]() No zoom— Resets the view's zoom.
No zoom— Resets the view's zoom.
![]() Zoom out—Returns
to the previous zoom level.
Zoom out—Returns
to the previous zoom level.
![]() Zoom in—Zooms
in (2x) on center of screen.
Zoom in—Zooms
in (2x) on center of screen.
![]() Zoom to scale—Zooms
to scale. The center of the zoomed
region is the center of the current zoom window.
Zoom to scale—Zooms
to scale. The center of the zoomed
region is the center of the current zoom window.
![]() Redraw map—Redraws the view.
Redraw map—Redraws the view.
|
|
|
Label translation refers to the process of changing a label in the input data into another label. The translation is specified in a translation file. This is useful for producing maps in different languages. To use the label translation facility a file of label translations must be provided, for example, English to Welsh: |
Cardiff Swansea
Caerdydd Abertawe
Maplex will read the data file in conjunction with the translations file to perform the necessary translations. Maplex matches the label in the translation file with the label in the data so these must correspond exactly.
|
Using the case conversion switch, Maplex can perform case conversions on the labels in the data files. For example, "cardiff" could be converted into "CARDIFF" or "Cardiff" using uppercase and mixed-case conversions respectively. |
With the alphanumeric conversion switch, Maplex can filter alphabetic or numeric characters out of a label. For example, "A17" could be converted into "A" or "17."
|
A feature can have more than one label. When it does, the labels en masse are referred to as a multilabel. Each multilabel component can have a separate feature code, which means that it can have its own font, box style, placement rules, and so forth. Note that only some parameters are applicable to multilabel components. |
The components can be positioned independently of one another according to the normal placement rules or relative to one another in a block or stack. The multilabel components are still positioned relative to the original feature.
|
Multilabel extraction refers to the process of extracting labels from a compound label in the input data. This process is important because the input label (as it appears in the input data file) may consist of many labels, some or all of which must be extracted and placed by Maplex. |
There are two forms of extraction based on the number of separators present in the label, single and paired.
Single separator extraction means that the same separator character is used between all the parts, so for example, there might be a label that consists of a string of the form Mt Everest/29 028ft/8848m/Hillary 1953. One of the separators is set to be "/" and Maplex can extract four component labels: Mt Everest, 29 028ft, 8848m, and Hillary 1953. Maplex cannot use a space as a separator (specifying a space effectively clears the separator field).
Paired extraction means that two different separator characters are used. This is useful when there is a sublabel that is parenthesized (or delimited in some other way). In this form of extraction the user specifies two different separators. Maplex can only extract two components of this form. For example, the input data could contain a string of the form Snowdon(3560ft). The label "Snowdon" and the label "3560ft" will be extracted from the string and placed according to the specification in the Rulebase.
|
Multilabel Positioning |
Stacked multilabels are labels that are treated as a group and are placed relative to each other inside that group. The first label extracted from the input string is the base label, and subsequent labels are placed relative to it. If the mountain heights were placed using a stacked multilabel style then the labeling could look like this: |
D
Snowdon
3560ft
A particular justification (centered, in this case) can be forced or Maplex can determine the best justification. Each label can have a different feature class so they can have different font, size, and box style.
The use of independent multilabels includes labeling mountain heights where the mountain name label could be placed under the mountain symbol and the height could be placed above the symbol, like this:
3560ft
D
Snowdon
|
There is a facility to load a selected label from a comma-separated multilabel. For example, if the input data have a label like this: "Cardiff, Caerdydd" |
then Maplex can load the first label in the list "Cardiff" or it can load the second label in the list "Caerdydd." Maplex can select one label from a maximum list length of eight labels.
|
Maplex uses a font modifier (fmod) file to describe the metrics and attributes of all the fonts it uses in the current project. The data in the fmod file give the dimensions of every character in the font, which Maplex needs for accurate positioning of labels. The easiest way to generate this file is to convert an Adobe Font Metric (AFM) file into a record in the fmod file. If there is pair kerning information in the AFM file, it also gets written to the fmod file. Maplex includes an integrated AFM-to-fmod converter. AFM files are available from Adobe, the Internet, or a font vendor. |
Maplex uses two types of fonts.
![]() On-screen fonts—Used for display purposes
On-screen fonts—Used for display purposes
![]() PostScript fonts— Used for printing
PostScript fonts— Used for printing
Maplex does not have the ability to display PostScript fonts on screen. The on-screen fonts are used as substitutes for these fonts. The important point to note is that the dimensions of the fonts used for label placement are based on the PostScript fonts the user has selected.
|
Maplex
comes with a standard fmod built for the PostScript standard set of
fonts. Maplex knows the metrics of
these fonts, and most PostScript printers will already have these fonts
available. |
|
There are two mechanisms for setting up fonts for use with Maplex. If PostScript fonts are going to be output, AFM files should be chosen; if ARC/INFO is going to be used to display the map then the ARC/INFO font index file should be used. |
|
If the AFM files are in Adobe Standard Encoding and the characters being used are in the top half of the character set (above the ASCII standard) then this switch should be selected. |
|
Maplex PostScript output files use the ISOLatin1 encoding of a font, rather than the standard encoding. Selecting the Show Minus Signs as Hyphens option sets up a translation in the fmod file that will convert minus signs into hyphens. |
|
Maplex fonts may contain up to 512 characters. To use more than 256 characters each Maplex font requires two Adobe font names, one for the normal font and the other for the alternate font. The normal font is used for plotting Maplex character values 0 to 255. The alternate font is used for plotting Maplex character values 256 to 512. The alternate font can be specified using the Alternate AFM File field next to the normal AFM File field. |
|
There are two mechanisms for specifying characters from the alternate font:
|
|
The user can change the way Maplex interprets the font size parameters specified in the Rulebase by using the Treat Font Height as Cap Height switch. The default for this option is off, which means that the font height parameter is taken as the normal height of the font. |
|
Maplex uses the label placement specification entered in the Rulebase to control the placement of a label on the map. |
|
Label style specifies how a label is aligned relative to the feature it is labeling. It determines the label's offset from the feature to which it refers and also the angle of the label relative to the feature. |
|
The basic choices for label alignment for point features are centered or offset. There are four new fixed direction alignments: NW, SW, NE, and SE. These can be used for fixed labels. |
There are now two variable direction alignments: Offset North or South and Offset South or North. These cater to situations where a north/south swapping of paired labels can be accepted.
There is an alternative offset in addition to the label offset. Maplex uses the alternative offset if it can't find a nonoverlapping position using the label offset.
|
Maplex can place names in preferred positions relative to a feature. A scheme based on label zones is used to specify the positioning preferences. All the possible labeling positions for a feature are divided into zones, and each zone is given a number. A list of zones in order of preference is used by Maplex to place the label. |
|
Label stacking refers to the process of splitting a label over more than one line. Maplex can evaluate the space available for a label and automatically split the label into parts that will best fit that space. |
The main parameters that control label stacking are
![]() Label
stacking switch—Enables
label stacking
Label
stacking switch—Enables
label stacking
![]() Stacked
label separators— Characters at which
a label may be split
Stacked
label separators— Characters at which
a label may be split
![]() Stacked
label inclusion switches—Shows or hides separators
Stacked
label inclusion switches—Shows or hides separators
The label stacking switch enables label stacking. This switch has the following states:
![]() None—No
stacking
occurs.
None—No
stacking
occurs.
![]() Stack—Forces
the label to be stacked.
Stack—Forces
the label to be stacked.
![]() May
stack —Allows Maplex to decide when to
split the label.
May
stack —Allows Maplex to decide when to
split the label.
To specify where the label may be split, use the stacked label separators parameter. The default value is a space character, but other characters, such as hyphens, could be used to split labels. Using the stacked label inclusion switches specifies whether the label separators should appear on the map or not.
Label splitting is constrained by the following parameters:
![]() Min stacked label length—The
shortest line allowed
Min stacked label length—The
shortest line allowed
![]() Max stacked label length—The
longest line allowed
Max stacked label length—The
longest line allowed
![]() Max label stacking level—Maximum
number of lines
Max label stacking level—Maximum
number of lines
If a label cannot satisfy these criteria then it will not be split and the data will need to be preprocessed or the labeled map will need to be edited.
|
If stacking is forced (Label stacking switch = Stack) then Maplex attempts to split the label to the fullest extent possible (i.e., the largest number of lines) in accordance with the constraints applied by the parameters described above. |
If stacking is left up to Maplex (Label stacking switch = May Stack) then Maplex tries out several combinations of splits. The first of these combinations to be tried is to maximize the number of lines in the label.
|
The justification of the lines in a split label is controlled by the stacked label justification parameter. This parameter has two values, which allows Maplex the freedom to decide on the justification. Maplex attempts to justify the label so that it is aligned on the side nearest the feature. If the label is above, below, or over the feature then it will usually be centered. |
|
The distance between a label and its feature is referred to as the label offset. Keeping a minimum distance between a label and other features or labels is referred to as label buffering. The parameters are |
![]() Label
to feature buffer—A
buffer between a label of any feature type (point, line, area, etc.) and point
features
Label
to feature buffer—A
buffer between a label of any feature type (point, line, area, etc.) and point
features
![]() Label
to label buffer—Buffer between label and other labels
(of any type of feature)
Label
to label buffer—Buffer between label and other labels
(of any type of feature)
|
Feature weights control the extent to which labels overlap features. Maplex will always try to place a label in an area of free space. If there is no free space available and a |
neighboring feature must be overlapped, then Maplex will choose to overlap a feature with the lowest weighting.
|
Label weights are similar to feature weights except they control the extent to which labels overlap other labels. Ideally no label overlap should occur on the map, but in dense parts of the map a limited amount of label overlap may be inevitable. |
|
Some parts of a map may contain more names in the map data than can be reasonably placed on the map. In such cases Maplex can be instructed to delete the less important names (and, optimally, associated features) from the map so that the map remains legible. The deletion process is controlled by a set of deletion priorities that allow the user to grade the relative importance of the place names. |
|
Maplex can connect line features into a network; enable this at the global level by selecting the Connect Line Features option in the data format screen. The number of labels generated at the feature class level can be controlled by varying the label repetition type; Minimize Labeling gives as few labels as possible while maintaining clear and unambiguous labeling. |
|
If the Data Format:Connect Line Features option is chosen, Maplex connects lines in one of two different ways: graphically or logically. |
|
Graphical Connection |
This accounts for data in which line features may be held as many noncontiguous segments. Adjoining line segments that all have the same label (or all have no label) may be connected together to form a single composite feature providing that either they are of the same feature class or they have exactly the same symbology and label parameters. |
|
Logical Connection |
Adjoining lines with the same (nonblank) label and exactly the same labeling parameters may optionally be connected for name placement purposes even if they have different symbologies, using the option Connect Lines with Different Symbology. If lines of different widths are connected, the name placement algorithms treat the resulting composite line as having the most popular of those widths. |
|
It can be specified to Maplex that a line's label should be spaced out to fill the entire length of the line. |
|
Maplex has street labeling functionality. This requires a special feature type, street, and is controlled by several Rulebase parameters, which are primarily used to determine how the street labels are reduced in size to fit within the streets. |
|
Creating Street Feature Classes |
Each street that is to be labeled as part of the street network must have a feature type of street. Two styles of labeling are available, centered and offset. The centered style is typically used for European street maps, while the offset style is more commonly used for American street maps. |
|
Labeling Segmented Streets |
The symbol plotting order is used to control how line features are joined into networks for the purposes of street labeling. All roads should have the same symbol plotting order for street labeling around the junctions of different classes of roads to work at its best. |
|
Conflict Resolution with Nonstreet Labels |
Maplex places all street labels first, then attempts to find positions for all other labels (e.g., points, line, and area labels). |
|
Input Data Requirements |
Maplex requires centerline coordinates for streets. Ideally, each street should be segmented (i.e., broken into separate features at all junctions with other streets that have labels). The segments need not appear in any particular order in the data file. Each segment must have the same label. If the streets are not segmented at junctions then Maplex has a facility to segment the data. |
|
Rulebase Parameters |
There are several Rulebase parameters that can be used to control the street mapping algorithms. These parameters can be specified individually for each feature class. Some of these parameters are street-specific and some are general. |
|
Abbreviating Street Names |
When a street name is too long for its street, Maplex normally tries abbreviating the keyword (e.g., SAINT becomes ST.) and the ending (e.g., ALBANY ROAD becomes ALBANY RD). In order for this to work, text files called strkeyw.abb and endings.abb must be supplied in the project folder. These files are a complete dictionary of all such abbreviations containing one line per abbreviation, and up to eight abbreviations can be specified for each word. |
|
Stacking |
Maplex may stack a name to fit it into a short street. To enable this facility, the label stacking switch must be set to May Stack. None of the usual label-stacking parameters apply when this happens; Maplex calculates the line leading and justification automatically. |
|
Overrun |
If the overrun switch is set to overrun, then Maplex may allow a street name to overrun the end of the street either into free space or into an adjoining street. |
|
Font Width Compression |
Maplex may compress a font (i.e., scale it horizontally) to make a name fit into a short street. |
|
Font Height Reduction |
Maplex may reduce the height of a font to make a street name fit into a short street. |
|
End of Street Clearance |
Names of more than one word are normally placed with the first word near one end of the street and the last word near the other end. |
The preferred amount of clear space between the name and either end of the street as well as a limiting value can be specified. Maplex will always try to place the name with the preferred offset from either end of the street, but if this is not possible then the end of street clearance may be reduced up to the specified limit.
|
Word Spacing |
The spacing between words in a street name will vary depending on
the number and length of the words and the length of the street. If the space between words becomes
unacceptably large, Maplex can repeat the name. If the space between the words |
becomes unacceptably small then Maplex can
apply other short street techniques, such as double banking, to fit the name
into the street.
|
Polygon labeling is controlled by the labeling style parameter. One of three styles can be specified: centered horizontal, centered straight, or centered curved. |
Maplex can place the label outside the area, horizontally, if the area is too small for the label if one of the above styles with the option is chosen.
|
Preset labels are labels that have already been placed. Maplex will not move or delete preset labels. Other labels are placed taking into account the weights and buffers of preset labels. |
|
Using Preset Labels in the Map |
The preset labels file is specified by entering the name of the file in the data file list. Maplex will only load preset labels for those features that have preset label loading enabled (preset label loading switch). Preset labels are always placed in their preset positions; they are never deleted. Other labels are placed around preset labels in the normal way. |
|
Maplex can perform "label fixing," which means that certain labels, those with the label fixing switch enabled, are placed in the normal way but without regard for other labels (except for any preset labels) and then fixed in place. The other labels are then placed on the map as usual, avoiding the labels already on the map according to their weights. |
|
Maplex saves deleted labels to a special file (in addition to logging them in the log file). |
|
Maplex can produce the following kinds of file output: unsymbolized features and unplaced labels, placed labels, and symbolized labels and placed labels. |
|
The Save Region command allows all currently loaded features in the current map bounds to be saved. The features are saved with their labels in MAPDATA format. |
|
Placed labels can be saved in the following formats: |
![]() Maplex—Maplex
format (.mpl)
Maplex—Maplex
format (.mpl)
![]() MAPDATA—MAPDATA format (.map)
MAPDATA—MAPDATA format (.map)
![]() IFF Text—LaserScan
Internal Feature Format (.txt)
IFF Text—LaserScan
Internal Feature Format (.txt)
![]() ARC/INFO—ARC/INFO
annotation coverage (.txt and others)
ARC/INFO—ARC/INFO
annotation coverage (.txt and others)
|
Maplex Format |
Maplex format (or MPL) is a proprietary format for saving positioned labels. It cannot be used for saving features. Its primary use is for saving labels that have been placed by Maplex and reading them into other software packages or reloading them as preset labels. The following parameters control the saving of labels in this format: |
![]() Label Saving Codes
indicate which elements of the label are to be output. The choices include Characters, Character
Boxes, Boxes, and Box Fillers.
Label Saving Codes
indicate which elements of the label are to be output. The choices include Characters, Character
Boxes, Boxes, and Box Fillers.
![]() Sort toggles sorting of the labels in the output file.
Sort toggles sorting of the labels in the output file.
![]() Save Presets
toggles the saving of any preset labels in
the map.
Save Presets
toggles the saving of any preset labels in
the map.
![]() Coordinates
indicates the point relative to the label extents that is saved as the label's
position. The choices include centered,
bottom-left, bottom-right, top-left, and top-right.
Coordinates
indicates the point relative to the label extents that is saved as the label's
position. The choices include centered,
bottom-left, bottom-right, top-left, and top-right.
|
ARC/INFO Annotation and Label Box Output |
Maplex can export placed labels as an ARC/INFO annotation layer and label boxes as arcs. These two elements are both written to the same coverage. The annotation is written in a subclass that can be specified in the Save Labels dialog. Thus, more than one set of annotation in the same coverage can exist. Symbology files (textset, lineset, and shadeset) and a relate file (to attach symbology to box outlines) are also created. |
ARC/INFO
Annotation Export |
ARC/INFO does not need to be installed on the same machine as Maplex nor does the machine need to have access to a license manager to export annotation. Instead, an ARCHOME environment variable and a number of ARC/INFO support files need to be present. The files used by Maplex must be the same as the ones available in ARC/INFO. |
When saving annotation, the annotation for the current view extent is generated. To save annotation on the entire map, the user should zoom out fully before saving the annotation.
Unplaced labels are stored in an annotation subclass with UNP appended to the supplied subclass name. Deleted labels are not stored.
A text symbol file is created. It has the same name as the annotation subclass (it also has a .txt extension) but is stored in $ARCHOME\symbols.
In order to get spacing and kerning
correct, Maplex exports each character as an individual piece of
annotation. If other environmental
variables are set, Maplex will write the annotation as lines
or words rather than characters, though text overlap may occur in the
annotation.
|
ARC/INFO Label Box Export |
Box outlines are generated as arcs in the annotation coverage. Line and shade symbology is also generated. A relate table that contains the items PATH_SYM, FILL_SYM, LABEL_ID, and LABEL_LEVEL is generated. The PATH_SYM relates the arcs in the box outline with a line symbol in the lineset. The FILL_SYM can be used to relate the regions built from the arcs with the fill colors in the shadeset. |
|
Label Levels
and Unplaced Labels |
Maplex has two levels of labels: background and foreground. Background labels are fixed. Foreground labels are normal labels (not fixed) and may be drawn on top of background labels. |
Labels can also be placed or unplaced. Unplaced labels are ones Maplex failed to place on the map (e.g., insufficient space, text too angular).
Annotation is written to one of two annotation subclasses: placed labels go to the subclass specified, and unplaced labels go to the subclass with the same name but with UNP appended.
|
Output can be in PostScript, Illustrator, or FreeHand files from Maplex. Each stores positioned labels and symbolized features. This operation is equivalent to plotting the symbolized features and labels to a device other than the screen, so Maplex only outputs the region displayed on the screen. |
|
Settings for PostScript, Illustrator, and FreeHand Formats |
For plot scale, Maplex can produce the files at true scale or autoscale (fit to page). True scale requires a map scale to be defined.
|
![]() For Illustrator and FreeHand output—A page size need not be defined
(since these packages paginate the output), but if a page size is defined then
the appropriate number of files will be produced.
For Illustrator and FreeHand output—A page size need not be defined
(since these packages paginate the output), but if a page size is defined then
the appropriate number of files will be produced.
Autoscale requires page sizes to be set for all output formats.
Plot Sections tells Maplex the number of files (pages) to use for autoscale output. The map will be scaled to fit onto the total area covered by these sections.
The Export Original Labels option passes the original label into the Illustrator file.
Page Margins specifies the distance between the physical edge of the media to the start of the drawing area.
Printable Page Size specifies the width and the height of the drawing area on the page.
Export for Mac can be enabled if the export files are intended for the Apple Macintosh.
|
Batch mode is very useful when there are a large number of similar maps to produce (i.e., multiple maps from the same specification, for example, atlases). Maplex software's batch processing facility allows the user to switch data for each job, switch specifications, start a batch file in another project, and specify output formats and preferences. |
|
Maplex has a batch processing facility. This facility allows the user to run a number of jobs (up to 1,000 in any project) and to produce output as PostScript, ARC/INFO annotation, Illustrator, or MPL files. |
The batch setup screen allows a number of job control parameters to be specified for a given project. These are run-time parameters, not Rulebase parameters. Projects, data files, map bounds, output formats, projection parameters, and so on can be changed.
These parameters are defaulted from the current project and are displayed as a list within the batch setup grid. The user simply edits the parameters in this grid. Maplex saves the batch file parameters (including all the projection parameters) when the user is done. Ordinary Rulebase parameters cannot be changed between batch jobs—the facility is meant for producing similar maps (i.e., with the same symbolization and placement specifications) from a number of different data sets or different views of the same data. Projects can be changed though; this means that a new set of Rulebase parameters can be used during a batch run.
|
The batch setup screen consists of a row for each batch job and a column for each batch parameter. The user can specify up to 1,000 batch jobs. Batch parameters override a subset of the parameters set up for a project. |
The Add Row button will add a row to the grid and default the batch job settings to those of the current project. This is most useful if a data file is currently open as the data file name will default automatically.
|
Graticule alignment allows the user to place labels so they are aligned with the lines of latitude on the map. This feature is useful for small-scale map applications such as atlases. The user can also project latitude–longitude format input coordinates using the projection screen. |
Maplex supports tangential alignment. That is, the labels are straight but angled so they lie at a tangent to the line of latitude at which they are positioned.
|
Input coordinates can be projected using the projection specification screen. Data must be in decimal degrees longitude–latitude format. |
If the Decimal Degrees option is enabled then the data are projected into meters. The units have no effect on graticule alignment; they are only used for feature projection.
In the longitude–latitude format:
![]() Positive values
are east of Greenwich or north of the equator.
Positive values
are east of Greenwich or north of the equator.
![]() Negative values
are west of Greenwich or south of the equator.
Negative values
are west of Greenwich or south of the equator.
|
The graticule alignment facility can be switched on or off for the entire map by checking the Enable Graticule Alignment box. Maplex then assumes that all the coordinates have been transformed according to the projection and can use the projection information to angle the labels it generates. |
There is a switch in the Placement section of the Rulebase called the Graticule Alignment Switch. This switches alignment on or off for individual feature classes. Feature symbols, as well as the label, are aligned with the graticule and the label.
|
In addition to the built-in point symbols, Illustrator drawings can be used in Maplex. These symbols are read into Maplex and drawn on both the on-screen map and any other symbolized map output (PostScript or Illustrator, for example). |
|
User-defined symbols for points are taken from Illustrator files. One file is used per symbol and this file must be stored in the Illustrator Symbols Folder. The name of the file is used within the Rulebase to indicate which symbol should be used for each feature class. |
Each symbol is drawn on the map at the size at which it is stored in the Illustrator file. These symbols are therefore scale independent (i.e., changing the map scale within Maplex will not affect the dimensions of these symbols).
The symbol is plotted with its origin at the feature's position so it is important that the user specify the origin correctly within Illustrator. Trial positions are generated about the symbol's actual graphical extent—the origin is not taken into account. Maplex approximates the shapes into either rectangles or circles.
Colors taken from the Illustrator file bypass the Maplex color table, so an unlimited number of colors can be used in point symbols. Patterns are not supported. Gradients are averaged from the two end colors. Text is only supported in as much text as can be broken down into paths within Illustrator and these can then be used within Maplex.
|
The Map:Colors menu item invokes a color table editor that allows modification of the basic palette from which all the colors used in Maplex are chosen. Each project has its own color table and can have only one of these tables. |
|
The color table editor consists of the following components: |
![]() Color names list—Lists the names of the sixty-four
colors in the palette
Color names list—Lists the names of the sixty-four
colors in the palette
![]() Color palette—An 8 x 8 pixel grid
showing the color of each of the colors
Color palette—An 8 x 8 pixel grid
showing the color of each of the colors
![]() Color rainbow—Changes the hue of
the selected color
Color rainbow—Changes the hue of
the selected color
![]() Luminosity scale—Changes the lightness
of the color
Luminosity scale—Changes the lightness
of the color
![]() Direct entry fields—Allows color values in RGB, HLS, or CMYK formats to be entered
Direct entry fields—Allows color values in RGB, HLS, or CMYK formats to be entered
|
By selecting a color in the color names list, the user can adjust the color associated with the selected name in a number of ways: |
![]() Use the color rainbow to change the hue.
Use the color rainbow to change the hue.
![]() Use the luminosity scale to alter the
luminosity.
Use the luminosity scale to alter the
luminosity.
![]() Type in the RGB,
HLS, or CMYK values.
Type in the RGB,
HLS, or CMYK values.
|
This section contains a brief description of all the Rulebase parameters used in Maplex. |
|
These are fundamental parameters that represent the user's feature classification. |
![]() Feature class code—Uniquely identifies each feature class. It is the key to the feature class table and is used as the
reference for those Rulebase parameters that are specified separately for each feature class.
Feature class code—Uniquely identifies each feature class. It is the key to the feature class table and is used as the
reference for those Rulebase parameters that are specified separately for each feature class.
![]() Feature class description— Holds a short
description of the feature class code.
Feature class description— Holds a short
description of the feature class code.
![]() Feature class type—Specifies a basic classification of feature classes in terms of
their elementary geometry. The classes
are point, line, area, area-point,
street, extracted area, and extracted area-point.
Feature class type—Specifies a basic classification of feature classes in terms of
their elementary geometry. The classes
are point, line, area, area-point,
street, extracted area, and extracted area-point.
|
These parameters control which features and labels are loaded, whether or not translation of labels takes place, case conversion, and so forth. |
![]() Feature
loading switch—Specifies which features are loaded
from the data files.
Feature
loading switch—Specifies which features are loaded
from the data files.
![]() Label
loading switch—Specifies which labels are loaded from
the data files.
Label
loading switch—Specifies which labels are loaded from
the data files.
![]() Preset
label loading switch—Specifies which preset labels are
loaded from preset label files.
Preset
label loading switch—Specifies which preset labels are
loaded from preset label files.
![]() Case
conversion switch —Controls case
conversion of label characters.
Case
conversion switch —Controls case
conversion of label characters.
![]() Alphanumeric
conversion switch —Filters alphabetic
or numeric characters out of a label.
Alphanumeric
conversion switch —Filters alphabetic
or numeric characters out of a label.
![]() Label
list index—Specifies which label is loaded from a label that is made up of
sublabels separated by commas.
Label
list index—Specifies which label is loaded from a label that is made up of
sublabels separated by commas.
![]() Label
translations file number—Label translation files can be
used to create maps in different languages from the same input data.
Label
translations file number—Label translation files can be
used to create maps in different languages from the same input data.
![]() Extracted
area boundary class—This is the feature class of boundary line segments for
an extracted area feature.
Extracted
area boundary class—This is the feature class of boundary line segments for
an extracted area feature.
![]() Extracted
area seed class— Specifies the feature
class of seeds (point features inside) for an extracted area feature.
Extracted
area seed class— Specifies the feature
class of seeds (point features inside) for an extracted area feature.
|
Symbology parameters specify the appearance of the map. |
![]() Symbol style—This
is the basic kind of symbolization that will be used by Maplex for this feature
class.
Symbol style—This
is the basic kind of symbolization that will be used by Maplex for this feature
class.
· Points
· Lines and Streets
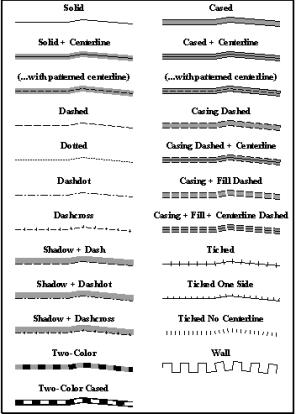
· Areas—For area features the symbol style can be no casing, cased, dashed casing, dotted casing, and dashdot casing.
![]() Symbol file name—Specifies the file name (excluding the directory) of a user-defined
point symbol in Illustrator format.
Symbol file name—Specifies the file name (excluding the directory) of a user-defined
point symbol in Illustrator format.
![]() Symbol width—Specifies
the width (or diameter) of a point symbol or the overall width of a line
symbol. This includes any casing or
shadow but excludes any ticks.
Symbol width—Specifies
the width (or diameter) of a point symbol or the overall width of a line
symbol. This includes any casing or
shadow but excludes any ticks.
![]() Symbol height—Specifies
the height of point symbols where the symbol style is not a circle.
Symbol height—Specifies
the height of point symbols where the symbol style is not a circle.
![]() Symbol fill color—The main color for a symbol (i.e., the color for solid and patterned
line features and the fill color for cased points, lines, and areas). For shadowed line styles, this is the color
of the shadow.
Symbol fill color—The main color for a symbol (i.e., the color for solid and patterned
line features and the fill color for cased points, lines, and areas). For shadowed line styles, this is the color
of the shadow.
![]() Symbol fill style—Set this to "Filled" to fill the feature with the symbol
fill color. Set to "Not
Filled" to draw the casing only, leaving the feature unfilled.
Symbol fill style—Set this to "Filled" to fill the feature with the symbol
fill color. Set to "Not
Filled" to draw the casing only, leaving the feature unfilled.
![]() Symbol casing width— Specifies the line width for the casing
(outline) around the symbol.
Symbol casing width— Specifies the line width for the casing
(outline) around the symbol.
![]() Symbol casing color—Specifies the color of the casing (outline) around the symbol.
Symbol casing color—Specifies the color of the casing (outline) around the symbol.
![]() Symbol centerline width—For line features where the symbol style includes an additional
centerline, this specifies the width of the centerline.
Symbol centerline width—For line features where the symbol style includes an additional
centerline, this specifies the width of the centerline.
![]() Symbol centerline color—For line features where the symbol style includes an additional
centerline, this specifies the color of the centerline.
Symbol centerline color—For line features where the symbol style includes an additional
centerline, this specifies the color of the centerline.
![]() Symbol inner size—For points, values greater than 0 cause a scaled-down version of the
shape to be drawn inside the main symbol, filled with symbol fill color 2.
Symbol inner size—For points, values greater than 0 cause a scaled-down version of the
shape to be drawn inside the main symbol, filled with symbol fill color 2.
![]() Symbol fill color 2—This gives the second fill color for two-color line styles and inner
point symbols.
Symbol fill color 2—This gives the second fill color for two-color line styles and inner
point symbols.
![]() Symbol dash length—Adjusts the length of dashes in patterned line styles. Also gives the tick length for ticked lines.
Symbol dash length—Adjusts the length of dashes in patterned line styles. Also gives the tick length for ticked lines.
![]() Symbol dash gap—Adjusts the gap between dashes in patterned line styles. Also gives the gap between ticks for ticked
lines.
Symbol dash gap—Adjusts the gap between dashes in patterned line styles. Also gives the gap between ticks for ticked
lines.
![]() Symbol dot length—Adjusts the length of dots in patterned line styles.
Symbol dot length—Adjusts the length of dots in patterned line styles.
![]() Symbol plotting switch—Indicates whether or not the feature and associated label are
plotted.
Symbol plotting switch—Indicates whether or not the feature and associated label are
plotted.
![]() Symbol plotting order—Specifies the order (256 first, 1 last) for plotting features.
Symbol plotting order—Specifies the order (256 first, 1 last) for plotting features.
![]() Symbol suppression switch—Specifies that the feature is not
to be drawn on the map but that its label is to be shown.
Symbol suppression switch—Specifies that the feature is not
to be drawn on the map but that its label is to be shown.
|
These parameters control the appearance of a label's text. |
![]() PostScript font—Specifies the font metrics used to symbolize and process the
font. The PostScript font name
is selected from the fonts specified in the font modifier file.
PostScript font—Specifies the font metrics used to symbolize and process the
font. The PostScript font name
is selected from the fonts specified in the font modifier file.
![]() Screen font—Specifies
the font displayed on the screen. The
screen font is used for display purposes only.
Screen font—Specifies
the font displayed on the screen. The
screen font is used for display purposes only.
![]() Font color—Specifies
the color of the characters of the label for this feature class.
Font color—Specifies
the color of the characters of the label for this feature class.
![]() Font height—Specifies the standard
height of each character in the label.
Font height—Specifies the standard
height of each character in the label.
![]() Font aspect ratio—Specifies the standard width of each character in the label as a
ratio of the font height parameter.
Font aspect ratio—Specifies the standard width of each character in the label as a
ratio of the font height parameter.
![]() Character spacing—Specifies the width of the space between label characters.
Character spacing—Specifies the width of the space between label characters.
![]() Line spacing—Specifies
the width of the space between the top and bottom parts of a stacked
label.
Line spacing—Specifies
the width of the space between the top and bottom parts of a stacked
label.
![]() Word spacing—Modifies
the standard width of space characters in a label.
Word spacing—Modifies
the standard width of space characters in a label.
![]() Font height reduction limit—This is the smallest allowable reduced font height; it must
correspond with the font height and reduction step.
Font height reduction limit—This is the smallest allowable reduced font height; it must
correspond with the font height and reduction step.
![]() Font height reduction step—This is the amount by which the font height may be progressively
reduced in order to fit a street name along a short stretch.
Font height reduction step—This is the amount by which the font height may be progressively
reduced in order to fit a street name along a short stretch.
![]() Font width compression limit—This is the smallest allowable font compression ratio; it must be a
multiple of the compression step.
Font width compression limit—This is the smallest allowable font compression ratio; it must be a
multiple of the compression step.
![]() Font width compression step—This is the amount by which the font width may be progressively
compressed in order to fit a street name along a short stretch.
Font width compression step—This is the amount by which the font width may be progressively
compressed in order to fit a street name along a short stretch.
|
These parameters control the appearance of label boxes. |
![]() Box shape—Controls
whether a label is drawn within a box and it specifies the shape of the
box.
Box shape—Controls
whether a label is drawn within a box and it specifies the shape of the
box.

![]() Box fill switch—Controls whether or not
a label box is filled using the box fill color.
Box fill switch—Controls whether or not
a label box is filled using the box fill color.
![]() Box border color—Specifies the color of
label box sides.
Box border color—Specifies the color of
label box sides.
![]() Box fill color—Specifies the color of
label box fillers.
Box fill color—Specifies the color of
label box fillers.
![]() Box border width—Specifies the
thickness of box sides.
Box border width—Specifies the
thickness of box sides.
![]() Box buffer width—Specifies the
thickness of the space between label characters and their box sides.
Box buffer width—Specifies the
thickness of the space between label characters and their box sides.
![]() Box height—The
height of a label box when it isn't stacked.
Box height—The
height of a label box when it isn't stacked.
![]() Box height when stacked—The height of a label box when it is stacked onto two lines; the box
graphics are stretched vertically to this height.
Box height when stacked—The height of a label box when it is stacked onto two lines; the box
graphics are stretched vertically to this height.
![]() Box width (1–4 characters)—The width of a label box when the longest line in the label has N
characters. For N>4 the width is
extrapolated. The box graphics are
compressed or stretched horizontally to fit this width.
Box width (1–4 characters)—The width of a label box when the longest line in the label has N
characters. For N>4 the width is
extrapolated. The box graphics are
compressed or stretched horizontally to fit this width.
|
Placement parameters control label placement. |
![]() Labeling style—Specifies
the general style of a label relative to its feature. The labeling style parameter has different options depending on the feature type.
Labeling style—Specifies
the general style of a label relative to its feature. The labeling style parameter has different options depending on the feature type.
· Points: For point features the parameter options are
¨ Centered offset
¨ Offset west
¨ Offset south
¨ Offset east
¨ Offset north
¨ Offset NW
¨ Offset SW
¨ Offset SE
¨ Offset NE
¨ Offset S or N
¨ Offset N or S
The diagram below shows some of these styles.
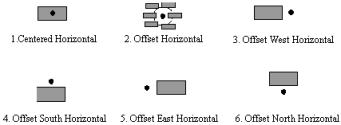
· Lines: For line features the options are
¨ Centered Horizontal ¨ Centered Straight ¨ Centered Curved
¨ Shifted Horizontal ¨ Shifted Straight ¨ Shifted Curved
¨ Offset Horizontal ¨ Offset Straight ¨ Offset Curved
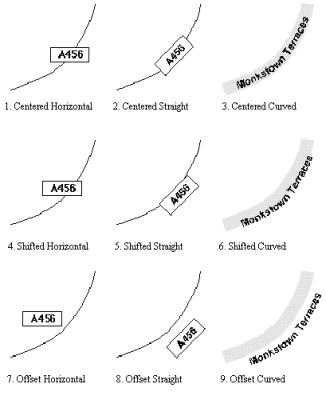
· Streets: For street features the options are
¨ Centered. Labels curve along the center of the line.
¨ Offset. Labels curve outside and along the line's casing.
· Areas: For area features the options are
¨ Centered Horizontal
¨ Centered Straight
¨ Centered Curved
¨ Centered Horizontal or Offset Horizontal
¨ Centered Straight or Offset Horizontal
¨ Centered Curved or Offset Horizontal
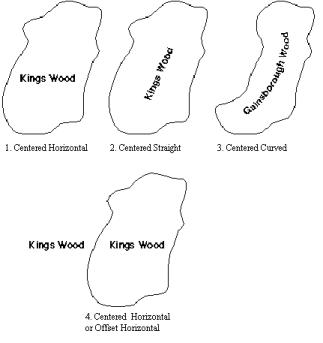
· Area-Points: For area-point features the options are
¨ Offset Horizontal
¨ Offset West Horizontal
¨ Offset South Horizontal
¨ Offset East Horizontal
¨ Offset North Horizontal
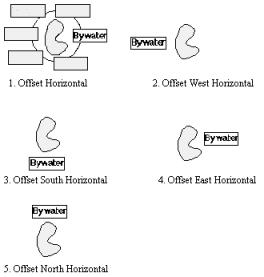
![]() Label offset— Specifies the distance between a label
and its feature.
Label offset— Specifies the distance between a label
and its feature.
![]() Alternative offset—Maplex uses the alternative offset if it can't find a nonoverlapping
position using the label offset. This
only applies to points. Maplex only
uses it if it is different from the label offset.
Alternative offset—Maplex uses the alternative offset if it can't find a nonoverlapping
position using the label offset. This
only applies to points. Maplex only
uses it if it is different from the label offset.
![]() Maximum horizontal shift—This only applies to point labels that are centered or aligned north
or south. It specifies a maximum shift
away from the normal center justification.
Maximum horizontal shift—This only applies to point labels that are centered or aligned north
or south. It specifies a maximum shift
away from the normal center justification.
![]() Maximum vertical shift—This only applies to point labels that are centered or aligned east
or west. It specifies a maximum shift
away from the normal center justification.
Maximum vertical shift—This only applies to point labels that are centered or aligned east
or west. It specifies a maximum shift
away from the normal center justification.
![]() Feature weight—Specifies
the importance of the feature relative to other features.
Feature weight—Specifies
the importance of the feature relative to other features.
![]() Interior area weight—Specifies the weight of the interior of area features.
Interior area weight—Specifies the weight of the interior of area features.
![]() Label weight—Specifies
the importance of the label relative to other labels.
Label weight—Specifies
the importance of the label relative to other labels.
![]() Label to feature buffer—Specifies the preferred minimum distance that labels should be from
features other than their own.
Label to feature buffer—Specifies the preferred minimum distance that labels should be from
features other than their own.
![]() Label to label buffer—Specifies the minimum distance that labels should be from other
labels.
Label to label buffer—Specifies the minimum distance that labels should be from other
labels.
![]() Label repetition type—Enables linear feature connection.
This has the effect of removing redundant repetitions of the same label
along a linear feature.
Label repetition type—Enables linear feature connection.
This has the effect of removing redundant repetitions of the same label
along a linear feature.
![]() Min. label repetition interval—Specifies the minimum distance along a line feature that must occur
before a label is repeated.
Min. label repetition interval—Specifies the minimum distance along a line feature that must occur
before a label is repeated.
![]() Abbreviation switch—Controls how abbreviations are applied to labels when a label
abbreviations file is used.
Abbreviation switch—Controls how abbreviations are applied to labels when a label
abbreviations file is used.
![]() Overrun switch—Allows
or disables a label to overrun the ends of streets or areas.
Overrun switch—Allows
or disables a label to overrun the ends of streets or areas.
![]() Graticule alignment switch—Turns on graticule alignment for a feature class.
Graticule alignment switch—Turns on graticule alignment for a feature class.
![]() Preferred label positions—This field specifies the preferred label placement positions for a
label relative to its feature.
Preferred label positions—This field specifies the preferred label placement positions for a
label relative to its feature.
Zone codes for point features and area-point features
![]()
Zone codes for linear features
![]() Label fixing switch—This should usually be left as not fixed. Fixed labels are positioned immediately after preset labels. They are positioned in the normal way but
without regard for any other text on the map (apart from any preset labels
present). After they have been placed,
they are locked in place.
Label fixing switch—This should usually be left as not fixed. Fixed labels are positioned immediately after preset labels. They are positioned in the normal way but
without regard for any other text on the map (apart from any preset labels
present). After they have been placed,
they are locked in place.
![]() Label exclusion switch—Applies to area features only and specifies that labels must not
overlap the area.
Label exclusion switch—Applies to area features only and specifies that labels must not
overlap the area.
![]() Maximum label angle—Specifies the maximum angle allowed for a label that is placed at an
angle when following a feature.
Maximum label angle—Specifies the maximum angle allowed for a label that is placed at an
angle when following a feature.
|
These parameters control how a label is stacked. |
![]() Label
stacking switch—Enables label stacking and specifies
the type of label stacking.
Label
stacking switch—Enables label stacking and specifies
the type of label stacking.
![]() Min.
stacked label length—Specifies the minimum number of
characters that must be in the shorter part of a stacked label.
Min.
stacked label length—Specifies the minimum number of
characters that must be in the shorter part of a stacked label.
![]() Max.
stacked label length—Specifies the maximum number of
characters in a label before stacking will definitely occur.
Max.
stacked label length—Specifies the maximum number of
characters in a label before stacking will definitely occur.
![]() Max.
label stacking level—Specifies the maximum number of lines
that Maplex will use to stack a label.
Max.
label stacking level—Specifies the maximum number of lines
that Maplex will use to stack a label.
![]() Stacked
label separators—These are characters that mark the
label splitting points in a label.
Typical separator characters are the space character, hyphens, and
slashes.
Stacked
label separators—These are characters that mark the
label splitting points in a label.
Typical separator characters are the space character, hyphens, and
slashes.
![]() Stacked
label inclusion switches—This is a string of six digits (0–5) separated by
spaces. Each value relates to the
corresponding stacked label separator and governs whether or not it is
displayed in the label.
Stacked
label inclusion switches—This is a string of six digits (0–5) separated by
spaces. Each value relates to the
corresponding stacked label separator and governs whether or not it is
displayed in the label.
![]() Stacked
label justification—Specifies the justification of stacked
label parts relative to the first part.
Stacked
label justification—Specifies the justification of stacked
label parts relative to the first part.
|
Label extraction refers to the process of extracting sublabels from the input label. |
![]() Label extraction switch—Turns on label extraction and specifies
whether one label is to be extracted from the input label or whether all of the
label components are to be extracted.
Label extraction switch—Turns on label extraction and specifies
whether one label is to be extracted from the input label or whether all of the
label components are to be extracted.
![]() Multilabel alignment style—Turns on multilabel extraction and
specifies the alignment style within the multilabel.
Multilabel alignment style—Turns on multilabel extraction and
specifies the alignment style within the multilabel.
![]() Label extraction separators—Marks the points at which the label is
broken into component parts. There are
two forms of extraction based on the number of separators present in the label,
single and paired.
Label extraction separators—Marks the points at which the label is
broken into component parts. There are
two forms of extraction based on the number of separators present in the label,
single and paired.
![]() Second component feature class—Specifies the feature class of the
second component label.
Second component feature class—Specifies the feature class of the
second component label.
![]() Third component feature class—Specifies the feature class of the
third component label.
Third component feature class—Specifies the feature class of the
third component label.
![]() Fourth component feature class—Specifies the feature class of the
fourth component label.
Fourth component feature class—Specifies the feature class of the
fourth component label.
![]() Multilabel line spacing—Specifies the line spacing in a stacked
multilabel. It applies to the second
and subsequent parts of the multilabel and controls the space above the label
part for which it is set.
Multilabel line spacing—Specifies the line spacing in a stacked
multilabel. It applies to the second
and subsequent parts of the multilabel and controls the space above the label
part for which it is set.
|
These parameters control the placement of labels on street features. |
![]() End of street clearance—Specifies the amount of clear space between the name and either end
of the street.
End of street clearance—Specifies the amount of clear space between the name and either end
of the street.
![]() Min. end of street clearance—The minimum amount of space between the beginning or end of a label
and the end of the street.
Min. end of street clearance—The minimum amount of space between the beginning or end of a label
and the end of the street.
![]() Min. word spacing—This is the smallest acceptable amount of clear space between the
words in a street name.
Min. word spacing—This is the smallest acceptable amount of clear space between the
words in a street name.
![]() Max. word spacing—When Maplex is placing a street name along a long street or road,
then it may expand the word spacing up to this limit.
Max. word spacing—When Maplex is placing a street name along a long street or road,
then it may expand the word spacing up to this limit.
|
Deletion Parameters |
These parameters control the deletion of labels. |
![]() Min. feature size for inclusion—Specifies a minimum size for line or
area features to be included on the map.
Min. feature size for inclusion—Specifies a minimum size for line or
area features to be included on the map.
![]() Min.
feature size for labeling—Specifies a minimum size for line or
area features for its label to be
included on the map.
Min.
feature size for labeling—Specifies a minimum size for line or
area features for its label to be
included on the map.
![]() Max.
line overhang—Determines what happens when a line
label is longer than its line. The
default (0.0) is to delete the label.
Other values are the maximum distance at either end of the line to which
the label will be allowed to extend.
Max.
line overhang—Determines what happens when a line
label is longer than its line. The
default (0.0) is to delete the label.
Other values are the maximum distance at either end of the line to which
the label will be allowed to extend.
![]() Label
deletion priority—Specifies the order (64 first, 1 last)
of deletion of overlapping labels.
Label
deletion priority—Specifies the order (64 first, 1 last)
of deletion of overlapping labels.
![]() Feature
deletion switch—Specifies whether a feature is to be deleted if Maplex had to delete
its label.
Feature
deletion switch—Specifies whether a feature is to be deleted if Maplex had to delete
its label.
|
Export parameters control file output. |
![]() Illustrator feature layer name—Assigns a layer name to the feature in the Illustrator output file.
Illustrator feature layer name—Assigns a layer name to the feature in the Illustrator output file.
![]() Illustrator label layer name—Assigns a layer name to the label in the Illustrator output file.
Illustrator label layer name—Assigns a layer name to the label in the Illustrator output file.
![]() Illustrator overprint switch—The value of this parameter is passed through Maplex as an attribute
to the Illustrator output file.
Illustrator overprint switch—The value of this parameter is passed through Maplex as an attribute
to the Illustrator output file.
![]() IFF label feature class—This is the feature code to be used in the IFF file.
IFF label feature class—This is the feature code to be used in the IFF file.
![]() IFF box 1–6 feature class—These are the feature codes to be used in the IFF file for label box
symbols.
IFF box 1–6 feature class—These are the feature codes to be used in the IFF file for label box
symbols.